Jira Integration
Introduction
After configuring Jira integration, you can synchronize project tasks to Jira for unified task management on the enterprise ticketing platform. Here are typical use cases:
- When device issues occur, automatically upload data and create tasks in Jira
- During data visualization analysis, create tasks at key timestamps and sync them to Jira
Operation Process
Configure Integration
Each project is configured independently, and only project administrators can edit
-
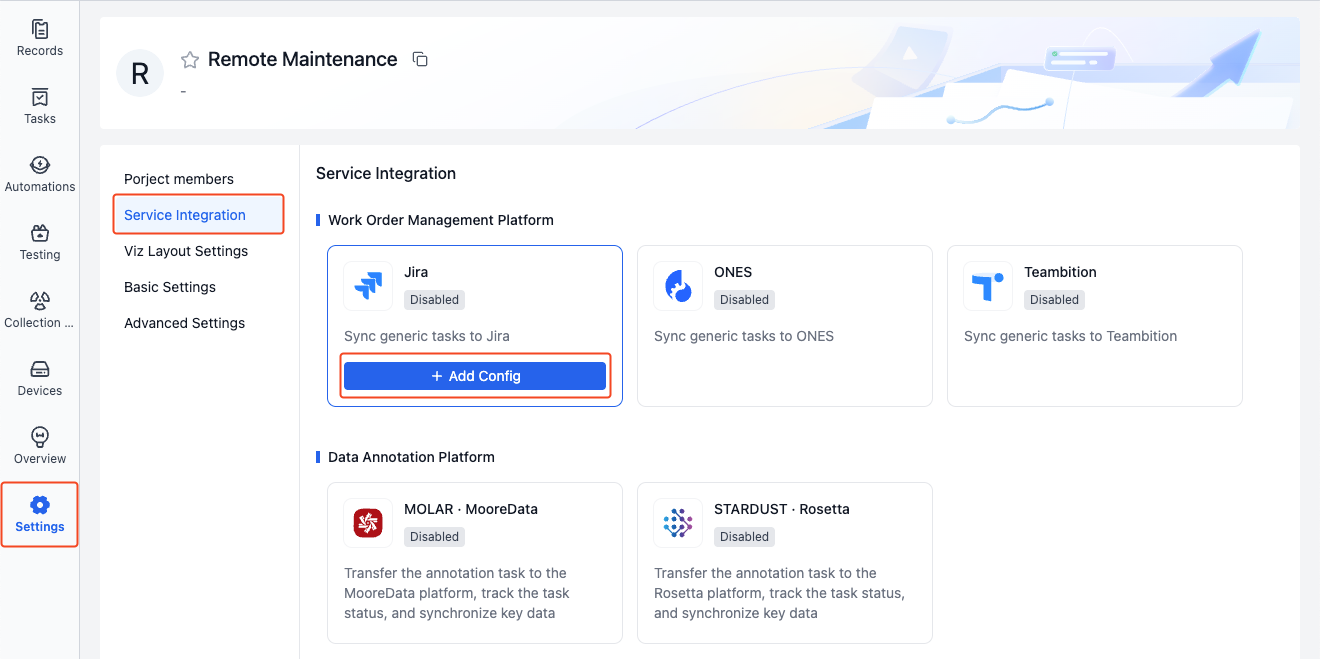
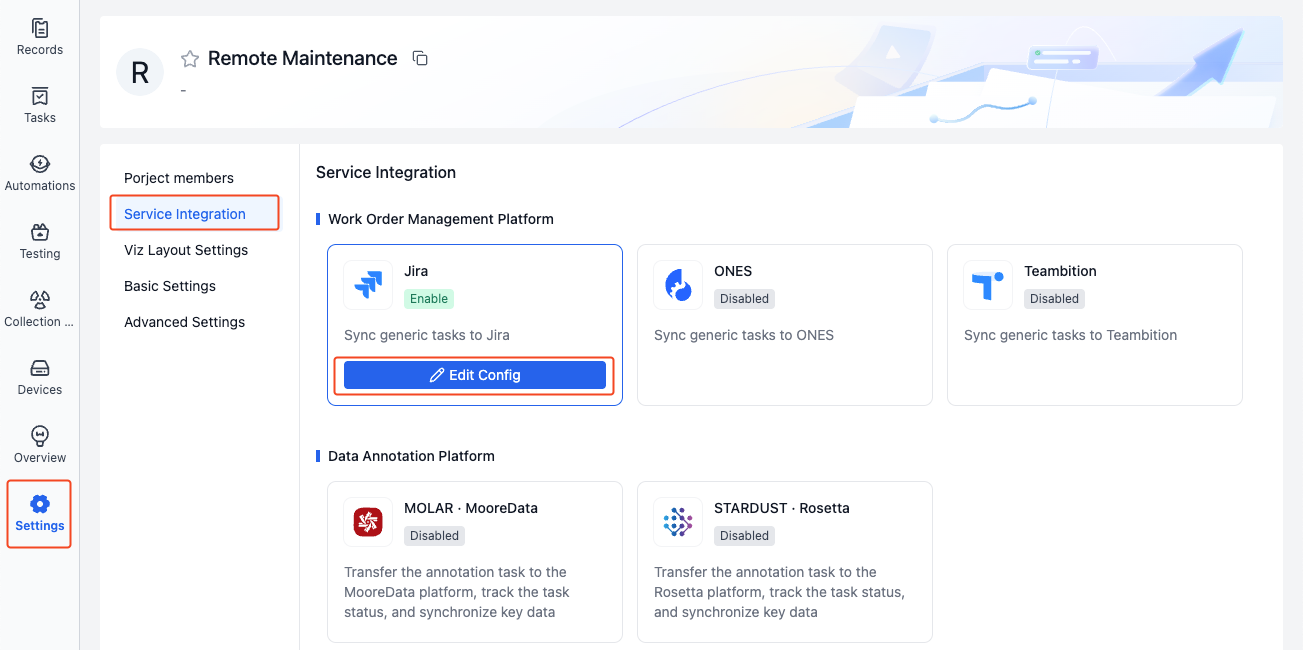
Enter the project that needs integration configuration, go to Project Settings - Service Integration - Jira, and click the [Add Config] button.
-
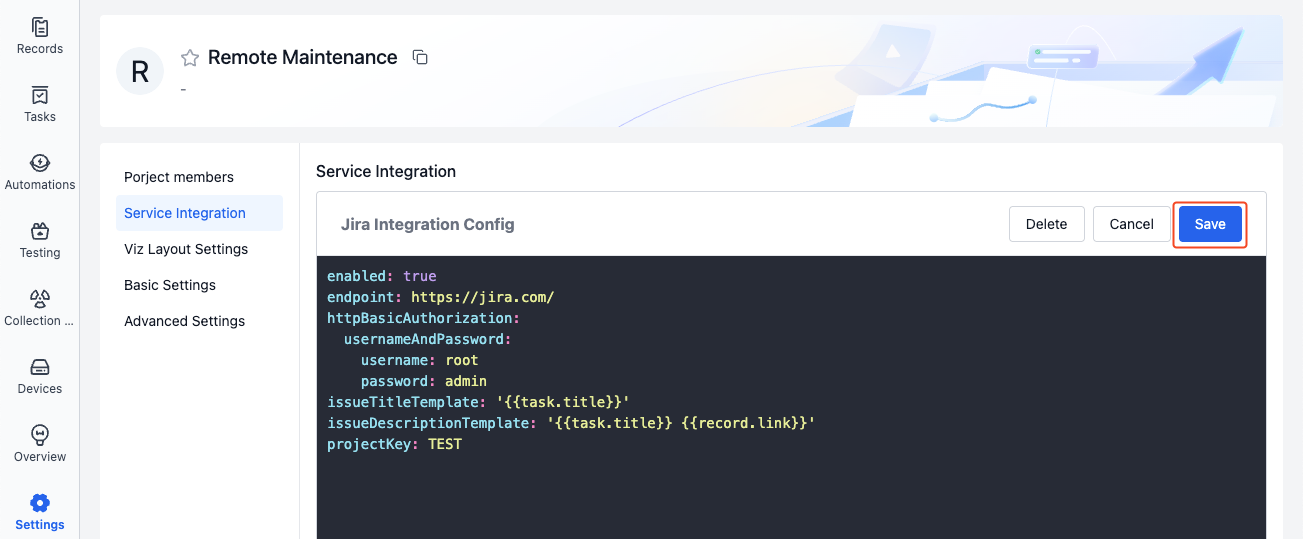
Fill in the integration configuration and save. Field descriptions are as follows:
enabled: true # Enable configurationendpoint: https://jira.com/ # Jira URLhttpBasicAuthorization:usernameAndPassword:username: root # Jira usernamepassword: admin # Jira passwordprojectKey: TEST # Jira project KeyissueType: 'Bug' # Jira issue typeissueTitleTemplate: '{{task.title}}' # Jira issue title, e.g., task nameissueDescriptionTemplate: | # Issue description[Task Name]: {{task.title}}[Device ID]: {{device.id}}[Record Link]: {{record.link}}customFields: # Issue custom fieldscustomfield_1:id: '88888' # Field 1 (dropdown style), select option with id 88888customfield_2: TEST # Field 2 (text box style), enter content as TESTcustomfield_3: # Field 3, enter P1value: P1
-
enabled
Jira integration status, enable/disable (true/false). Enabled by default, when disabled tasks cannot be synced to Jira
-
endpoint
Jira URL, e.g.,
https://www.atlassian.com/ -
username
Jira username, used to create issues and get issue information in Jira projects with this user's identity
-
password
Password corresponding to the Jira username
-
projectKey
Jira project Key, create issues in this project. The project Key needs to be looked up on the Jira platform, as shown:

-
issueType
Issue type, configure what type of issue to create (bug/task/other), obtain as follows:
-
Open browser, modify as needed and enter the following URL to get information about all issue types in the Jira project.
{jira_endpoint}/rest/api/2/project/{projectKey}Where:
{jira_endpoint}: Jira URL, e.g., https://www.atlassian.com/{projectKey}: Jira project Key
-
After getting all issue type information, use ctrl + f shortcut to quickly find the id corresponding to the issue type you need to configure, e.g., find the id value for
issuetypeBug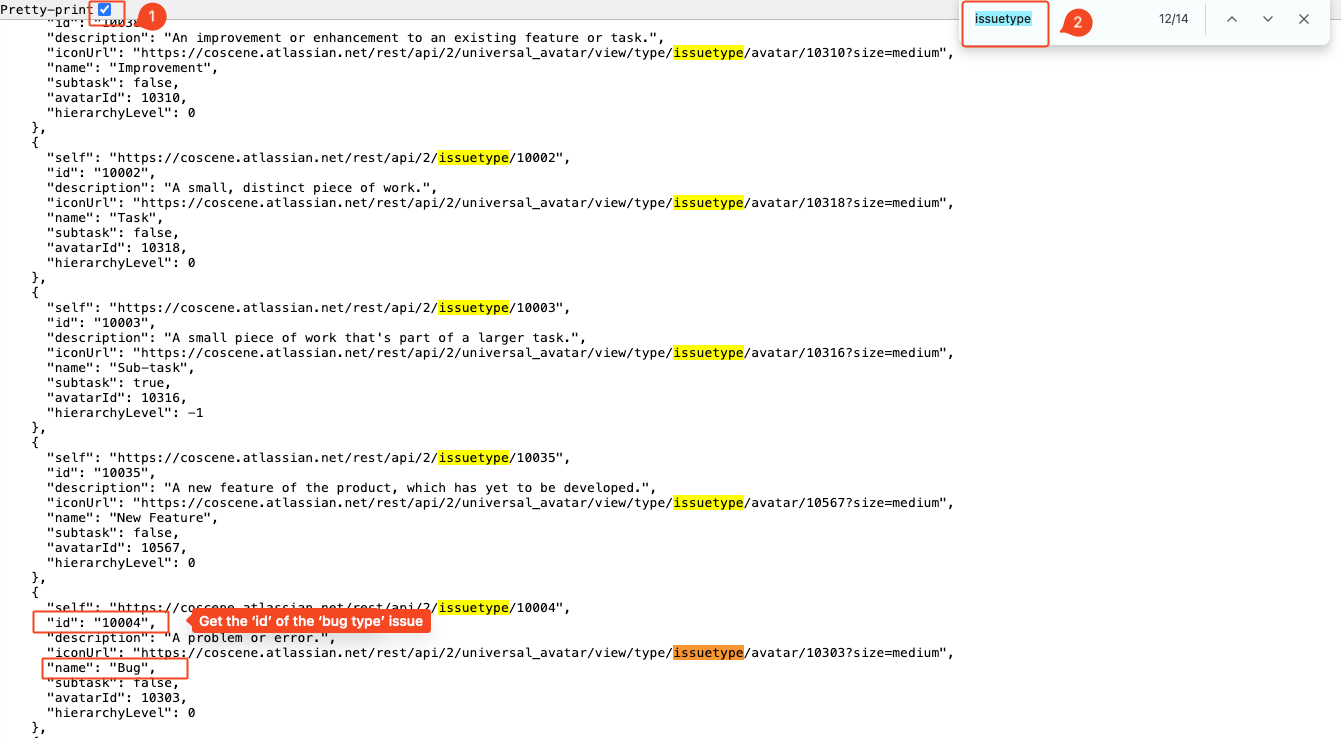
-
After finding the id corresponding to the issue type, configure it in the
issueTypefield.issueType: '10004' # Jira issue type
-
-
issueTitleTemplate
Jira issue title template, can be customized or use variables, defaults to using the general task title, i.e.,
'{{task.title}}' -
issueDescriptionTemplate
Jira issue description template, can be customized or use variables
-
customFields
Issue custom fields, can be customized or use variables. Get custom field names and values as follows:
-
Open browser, modify as needed and enter the following URL to get information about all fields in the Jira project.
{jira_endpoint}/rest/api/2/issue/createmeta?projectKeys={projectKey}&expand=projects.issuetypes.fieldsWhere:
{jira_endpoint}: Jira URL, e.g., https://www.atlassian.com/{projectKey}: Jira project Key
-
After getting all field information, use ctrl + f shortcut to quickly find the custom field name you need to configure, e.g., find the name and value of field
test1-type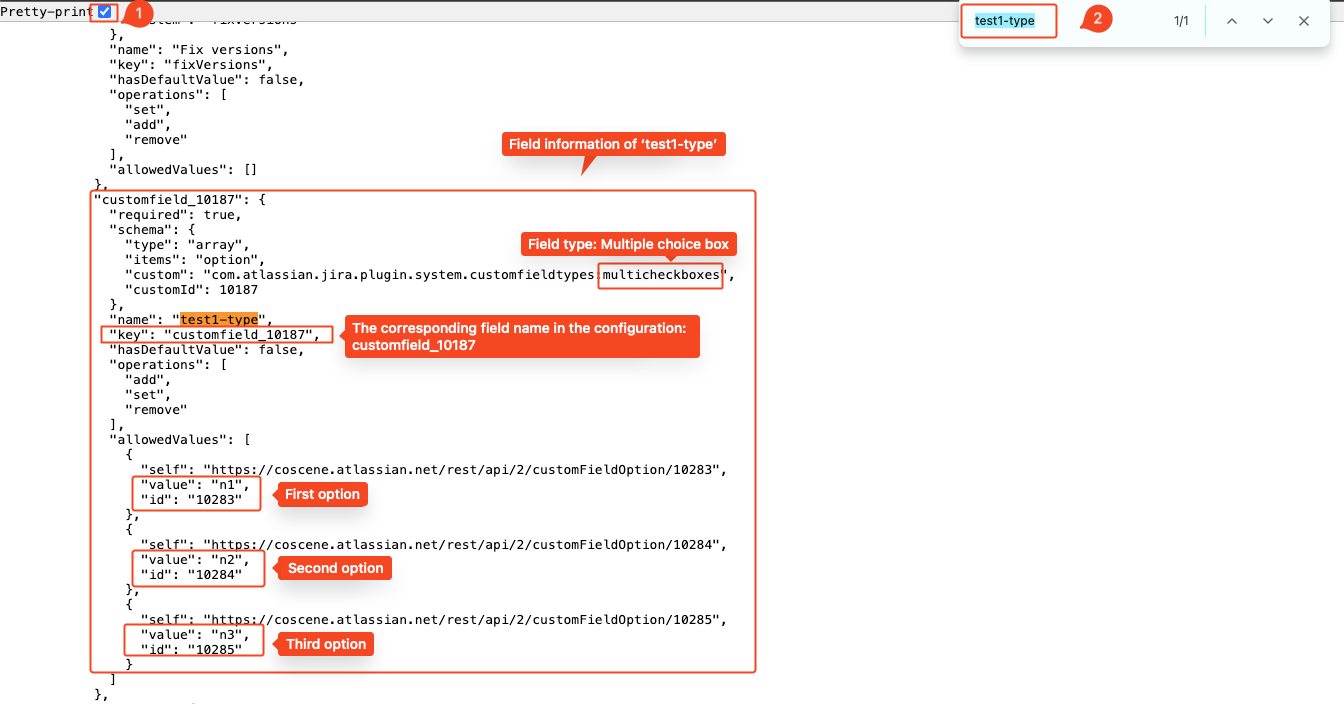
-
Enter the corresponding field format according to the Jira Official Documentation, enter the field name and value in the Jira configuration. Taking the multi-select box
test1-typeas an example:-
Find "Multi-select Type" in the Jira official documentation, copy the format
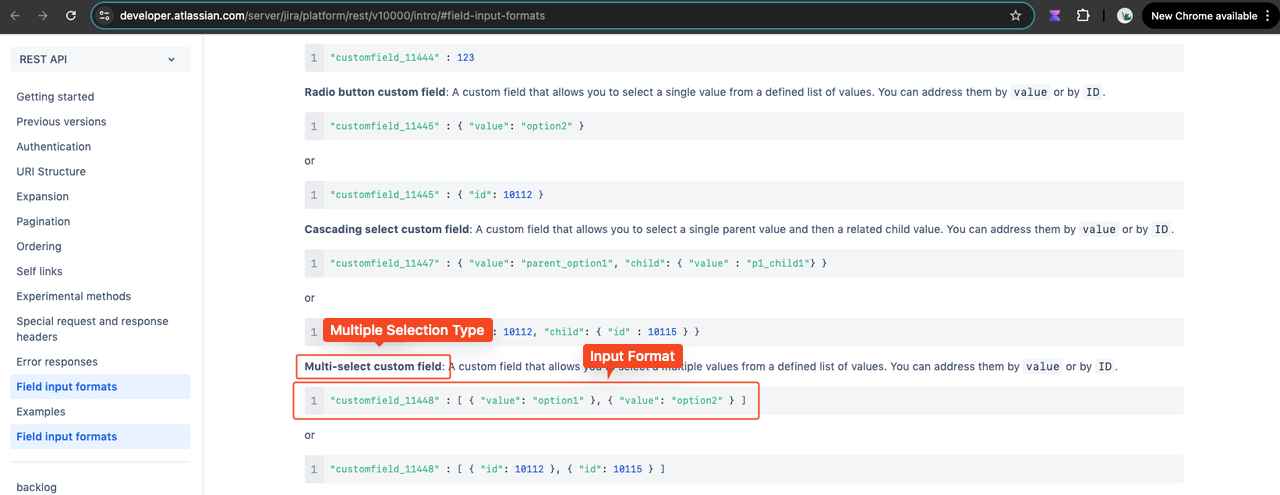
-
Under custom fields in the Jira configuration, paste the "Multi-select Type" format, replace the content with the previously found
test1-typefield name and valuecustomFields:'customfield_10187': [{ 'value': 'n1' }, { 'value': 'n2' }]
-
-
Variable Description
Task information in integration supports using variables, see the table below:
| Variable Name | Meaning |
|---|---|
{{task.title}} | Task name |
{{record.title}} | Record name |
{{record.description}} | Record description |
{{record.labels}} | Record labels |
{{record.link}} | Record link |
{{device.id}} | Device ID |
{{device.title}} | Device name |
Synchronize Tasks to Jira
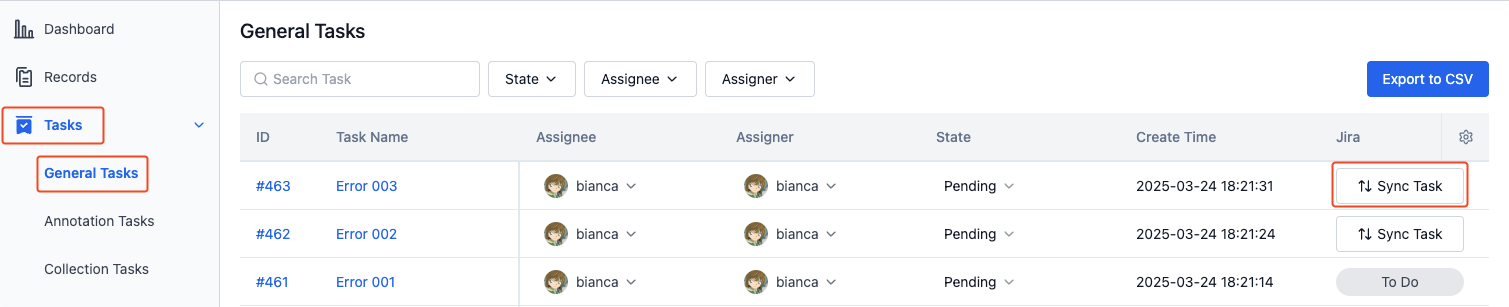
After Jira integration configuration is complete, general tasks in the project can be synchronized to Jira. Learn about General Tasks
-
Enter the project's "General Tasks" page, click the [Sync Task] button corresponding to the task
-
After successful synchronization, the created Jira link and status will be displayed. Click the status button to jump to Jira to view issue details.
Managing Jira Integration
Only project administrators can manage Jira integration
Edit Integration
-
In the project, go to "Project Settings - Service Integration" page, click [Edit Config] for Jira.
-
After completing the configuration, click [Save].
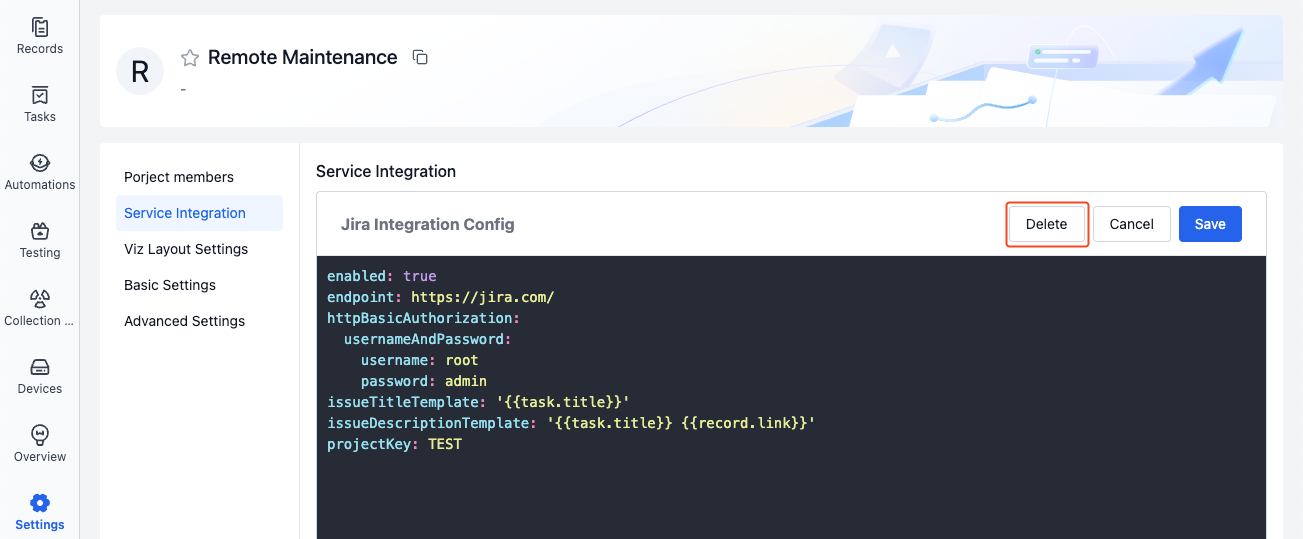
Delete Integration
-
In the project, go to "Project Settings - Service Integration" page, click [Edit Config] for Jira.
-
Click [Delete], confirm again to delete the integration information. After deletion, tasks cannot be synchronized to Jira.